Blog - Hacking into my car radio
When we bought our car a few years ago in Prague it came fitted with a standard BMW radio. Because of its age it didn't have an auxiliary in port, or a USB port, or support Bluetooth. It didn't really have anything, really, except for a cassette player, meaning the only way to hook up anything external was through a cassette adapter. Ours kinda worked, but the sound quality was bad, the cassette player kept auto-reversing the cassette adapter, swapping the left and right channels, and the steering wheel buttons couldn't be used for anything but volume control. Clearly, something had to be done :)

At the same time something else was missing: proper audio control. The steering wheel's forward and reverse buttons were of no use with the cassette adapter, so I wanted to use these for something else. Wouldn't it be nice if one of those buttons could function like the button on iPhone headphones? That would enable pausing, skipping, fast forwarding, etc.
In theory this could work if I could get the signal from one of those buttons to the cassette adapter's 3.5mm plug and into the phone. For this I would need to replace the plug with a 4-ring version (TRRS), and short circuit ring 2 with the sleeve to simulate a button press. (Short-circuiting ring 2 and the sleeve is exactly how a button press on iPhone headphones works.)
Next I needed to find out where to tap into the system to receive such a button press from the steering wheel. In tape mode pressing the forward button causes the cassette player to fast forward, driving a different motor than used for playback, so that's what I tapped into :)

I found the chip's pins too small to solder to, so I traced where they wound up on the circuit board (see the colored circles above).
Unfortunately, however, after everything was hooked up I turned on the radio, and *poof*, smoke came out… :P Must've soldered something wrong… While the radio still worked, the cassette player was busted, so I had to find myself an …
First off, I needed a converter cable from the car's BMW17 pin layout to ISO 10487, plus an adapter for the car's antenna signal. Secondly I needed something to cover up the huge gaping holes left over after replacing the big stock radio with a smaller single DIN aftermarket version:
BMW makes use of I-Bus (IBUS) to send control signals through the car for non-critical systems, such as the radio, telephone, park distance control, seat memory, etc., all over the same wire. This wire is also present in the BMW17 radio connector (pin 7), but not in the converter cable I needed, because whatever aftermarket radio you'd hook up, it probably wouldn't be able to understand I-Bus signals anyway.
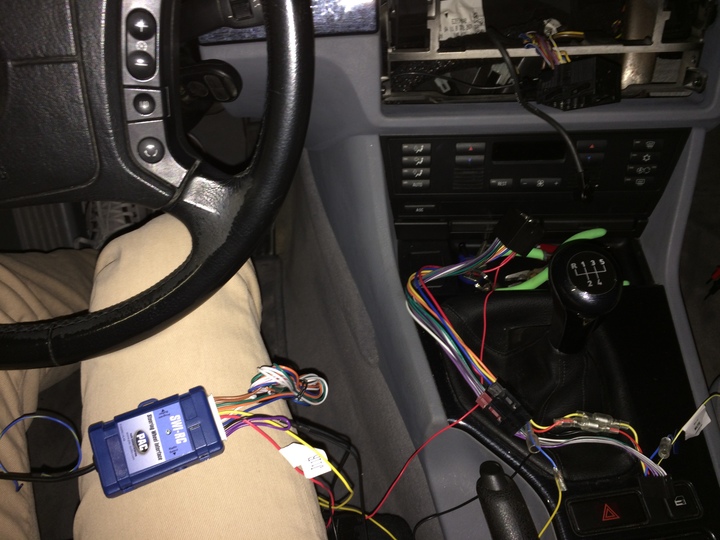
In other words: I needed a converter from I-Bus signals to something my Pioneer radio would understand. After some searching I found the PAC SWI-RC, which interprets signals coming in, and sends out the correct equivalent. Great, you'd think. Once again, not that simple :)
Its instructions specific for our car say the PAC SWI-RC should be connected to the I-Bus wire at the steering wheel column. This bothered me, because I wanted to hook it up in the radio mounting, where there was ample space for it, and where the interpreted signal would eventually have to go anyway. However, support insisted I do it at the steering wheel column, as per the instructions, as "there is usually very good reason for it."
The intended wire and the one in the BMW17 radio connector had the same white/yellow/gray color, so I had hope connecting it in the radio mounting would work anyway. But before making my order I wanted to be sure.
I first checked the voltages at both ends of what seemed to be one and the same wire; they were the same, with and without buttons pressed. The resistance between both ends was practically zero. But the signal coming through also had to be the same at both ends. I read up on how I-Bus works, and found it uses simple 9600 baud, even parity, 1 stop bit serial signal communication. This kind of signal is supported by my Arduino Uno, but it only has one such serial port, meaning I couldn't also use that to output captured data to my laptop. Instead I wrote everything to the connected LCD screen.
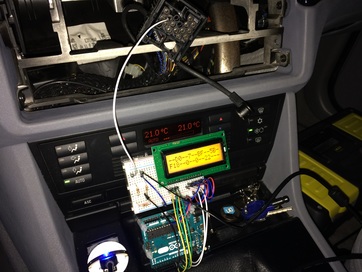
I used a voltage divider to bring the 12V I-Bus signal down to 4V, which still registers as a high signal. The Arduino gets its power from a USB car charger, and hence shares ground with the BMW17 radio connector.
The setup worked like a charm, and indeed, the signals coming through when pressing the buttons were the same when I hooked up the sensor to either end of whatI had now confirmed for all intents and purposes to be one and the same wire. Update 2015-08-25: although the same signal was coming through at both ends, they did not (physically) belong to the same wire. I found out a while later that when driving the signal would not always come through (it did when idling), maybe because of interference from other signals traveling over the same wire. In the end I did hook up the PAC SWI-RC directly at the steering wheel column, and now all is well :)
(Arduinos are great fun, btw., especially since I got mine together with a breadboard, LEDs, resistors, a buzzer, displays, and lots more. Although it's way less powerful than a PSP (no multiple tone support, limited processing power), deploying for an Arduino is so much easier.)Unfortunately my converter cable didn't connect the car's I-Bus pin (pin 7) to anything, so I moved the pin of the blue "el. antenna" wire (not used in my car) from pin 16 here, and disconnected it at the other end (see the blue disconnected wire on the left picture below). Update 2015-08-25: I pulled an extra wire from the steering wheel column to the radio connector, as per the instructions.
After a bit of soldering I managed to fit the entire wire mess snugly in the radio mounting :)

P.S.: only later did I find out Pioneer itself also sells a remote interface. Although it would've been a lot easier to install, it seems you cannot program what the button presses do. (I use the reverse button to mute the audio, for lack of pausing functionality.)
Hacking into the stock radio
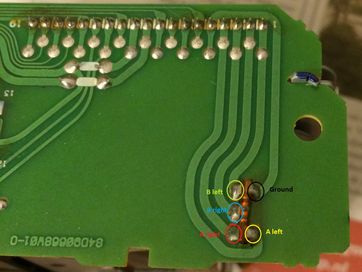
In order to improve the audio signal coming through I figured I could connect the wires of the cassette adapter's 3.5mm plug directly to those connected to the cassette player's magnetic tape head, thereby bypassing any electric => magnetic => electric conversion and subsequent signal attenuation. The idea sorta worked, with music coming from my phone at the lowest possible volume being played quite loud, but not very clear…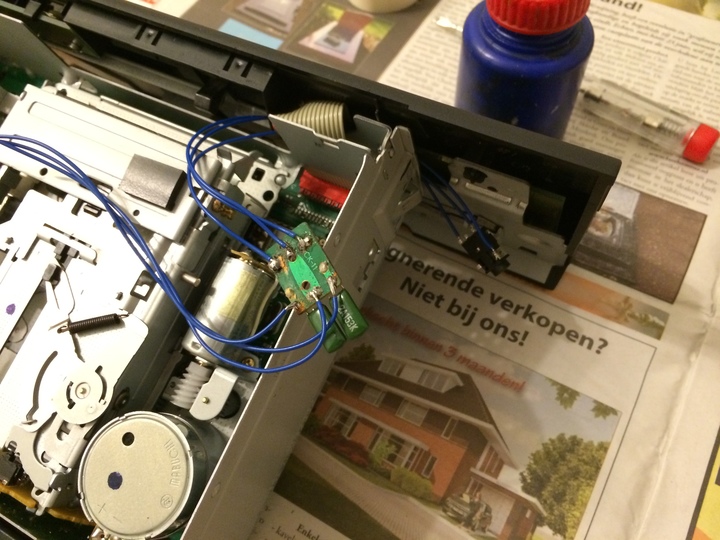

(Left: AUX connector + cassette adapter internals. Right: there are 4 tracks: side A/B + left/right.)
At the same time something else was missing: proper audio control. The steering wheel's forward and reverse buttons were of no use with the cassette adapter, so I wanted to use these for something else. Wouldn't it be nice if one of those buttons could function like the button on iPhone headphones? That would enable pausing, skipping, fast forwarding, etc.
In theory this could work if I could get the signal from one of those buttons to the cassette adapter's 3.5mm plug and into the phone. For this I would need to replace the plug with a 4-ring version (TRRS), and short circuit ring 2 with the sleeve to simulate a button press. (Short-circuiting ring 2 and the sleeve is exactly how a button press on iPhone headphones works.)
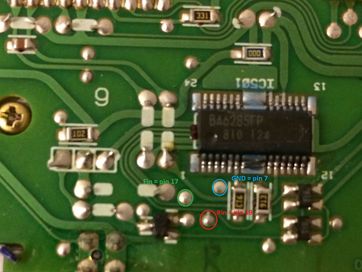
Next I needed to find out where to tap into the system to receive such a button press from the steering wheel. In tape mode pressing the forward button causes the cassette player to fast forward, driving a different motor than used for playback, so that's what I tapped into :)


(This chip controls the tape head motors.)
I found the chip's pins too small to solder to, so I traced where they wound up on the circuit board (see the colored circles above).
Unfortunately, however, after everything was hooked up I turned on the radio, and *poof*, smoke came out… :P Must've soldered something wrong… While the radio still worked, the cassette player was busted, so I had to find myself an …
Aftermarket radio
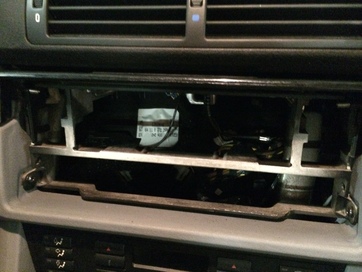
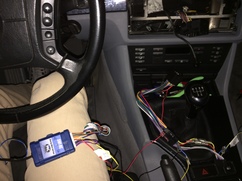
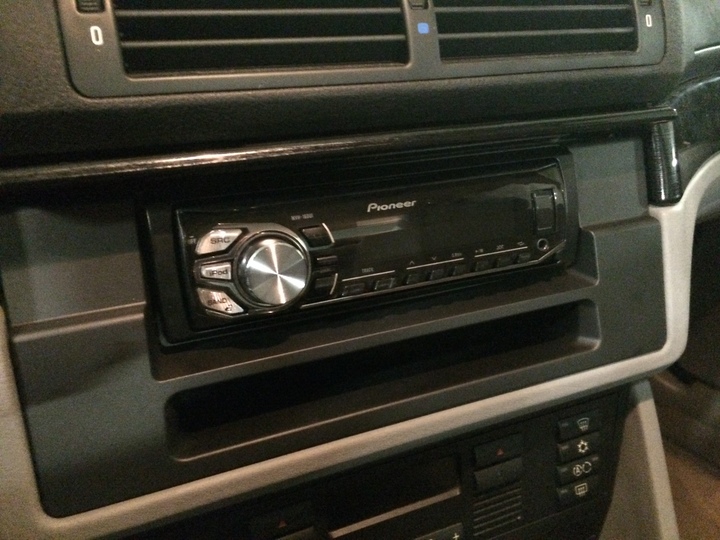
Finding the radio was easy enough: I settled for the Pioneer MVH-160UI. It has an auxiliary in port and a USB port, which supports iPod compatible devices (like my iPhone, which it charges at the same time). Installing it was a bit of a different story, though.First off, I needed a converter cable from the car's BMW17 pin layout to ISO 10487, plus an adapter for the car's antenna signal. Secondly I needed something to cover up the huge gaping holes left over after replacing the big stock radio with a smaller single DIN aftermarket version:

Steering wheel buttons
The radio worked great, but I quickly noticed the steering wheel buttons had stopped working… The radio supposedly supported it out of the box, but once again things weren't that simple.BMW makes use of I-Bus (IBUS) to send control signals through the car for non-critical systems, such as the radio, telephone, park distance control, seat memory, etc., all over the same wire. This wire is also present in the BMW17 radio connector (pin 7), but not in the converter cable I needed, because whatever aftermarket radio you'd hook up, it probably wouldn't be able to understand I-Bus signals anyway.
In other words: I needed a converter from I-Bus signals to something my Pioneer radio would understand. After some searching I found the PAC SWI-RC, which interprets signals coming in, and sends out the correct equivalent. Great, you'd think. Once again, not that simple :)
Its instructions specific for our car say the PAC SWI-RC should be connected to the I-Bus wire at the steering wheel column. This bothered me, because I wanted to hook it up in the radio mounting, where there was ample space for it, and where the interpreted signal would eventually have to go anyway. However, support insisted I do it at the steering wheel column, as per the instructions, as "there is usually very good reason for it."
The intended wire and the one in the BMW17 radio connector had the same white/yellow/gray color, so I had hope connecting it in the radio mounting would work anyway. But before making my order I wanted to be sure.
I first checked the voltages at both ends of what seemed to be one and the same wire; they were the same, with and without buttons pressed. The resistance between both ends was practically zero. But the signal coming through also had to be the same at both ends. I read up on how I-Bus works, and found it uses simple 9600 baud, even parity, 1 stop bit serial signal communication. This kind of signal is supported by my Arduino Uno, but it only has one such serial port, meaning I couldn't also use that to output captured data to my laptop. Instead I wrote everything to the connected LCD screen.
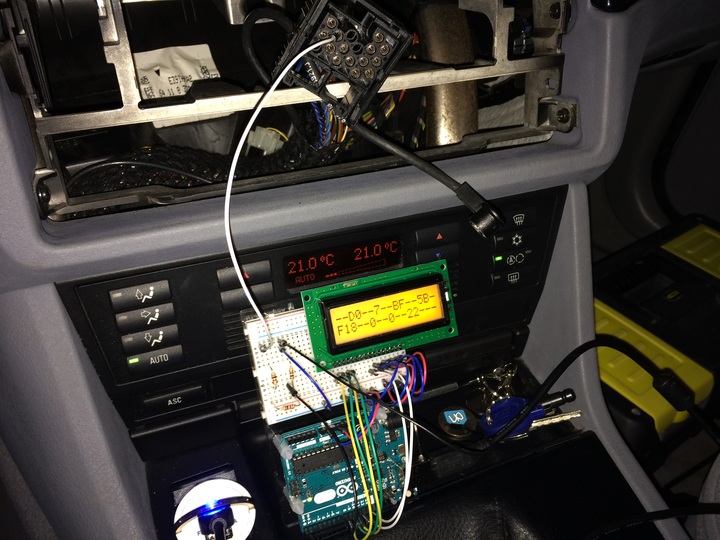
I used a voltage divider to bring the 12V I-Bus signal down to 4V, which still registers as a high signal. The Arduino gets its power from a USB car charger, and hence shares ground with the BMW17 radio connector.
The setup worked like a charm, and indeed, the signals coming through when pressing the buttons were the same when I hooked up the sensor to either end of what
(Arduinos are great fun, btw., especially since I got mine together with a breadboard, LEDs, resistors, a buzzer, displays, and lots more. Although it's way less powerful than a PSP (no multiple tone support, limited processing power), deploying for an Arduino is so much easier.)
PAC SWI-RC
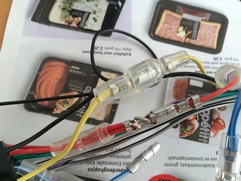
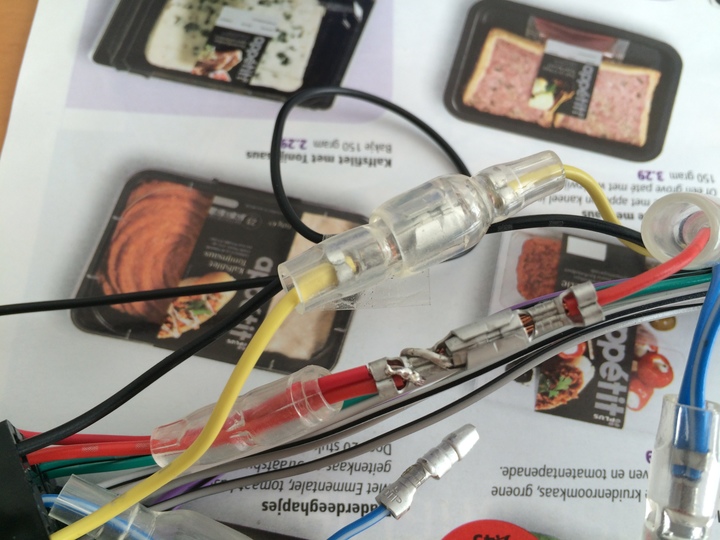
I then ordered my PAC SWI-RC from the American Amazon, which was a lot cheaper than buying it in Europe. I wanted to hook up the PAC SWI-RC as close to the radio as possible, where I'd need to connect to three wires: red 12V, black ground, and I-Bus signal.After a bit of soldering I managed to fit the entire wire mess snugly in the radio mounting :)
P.S.: only later did I find out Pioneer itself also sells a remote interface. Although it would've been a lot easier to install, it seems you cannot program what the button presses do. (I use the reverse button to mute the audio, for lack of pausing functionality.)