Blog - Hello plant, how are you?
After last year's home improvement I felt it was time for something new. A good home is never done, after all, so after browsing amperka.ru (in Russian only) I stumbled upon their soil moisture sensor and instructions on how to automatically water plants (also in Russian only). Pretty neat :)
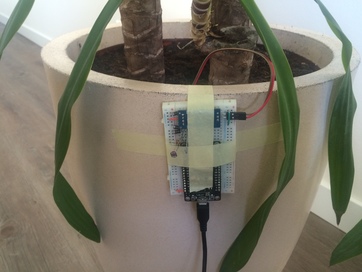
I figured I could do something similar, but didn't feel like having a water tank and pump next to every plant. I wanted something small and inconspicuous that would tell me when it's time to water the plants. Ideally, data about the plant (humidity, brightness and temperature) would regularly be sent to my server, where it could be plotted and monitored. A few solutions already exist, but they're quite pricey, and it's a lot more fun doing it yourself :)
(If you're not interested in the technical details, you can skip right to the end.)
I eventually came across the NodeMCU, an Internet of Things microcontroller with the ESP8266 WiFi chip already integrated. The form factor makes sure it fits snugly on a breadboard with some extra room for the sensors.
The idea is to send a high signal (3.3V) only to one sensor at a time, whose analog value is then sent through a diode back to the NodeMCU's single analog input port. Without the diode, the other sensors would interfere with the signal, distorting it. This setup worked quite well: every sensor gave stable signals when changing the input for the others. E.g., the reported humidity level stayed the same when changing the temperature or the brightness the plant was exposed to.
There was one small problem measuring the temperature, though. Relative values are fine for humidity and brightness: low is bad, high is good. Well, sort of. But for temperature that doesn't cut it. Using the thermistor's datasheet and an extra resistor it's possible to calculate the actual temperature being measured, but the diode influences the resistance too, and not in a very predictable way… After some calibration with and without the diode the reported temperatures should now be fine, though :)
The design could use some improvements, I agree, but hey: it works!
(P.S.: don't use Arduino's String class: it's apparently quite bad. Just use char* instead :)
A couple of things stand out:
Also, when we're going to add more plants, then referring to "that plant in the corner" doesn't quite cut it anymore when viewing graphs, so we decided to name our plants :P There're going to be four of them, and so far we've got: Pasha (Паша), Marcel, Rotjeknor and Dalek (I just don't like that plant). As you can imagine, better suggestions are welcome ;)
I figured I could do something similar, but didn't feel like having a water tank and pump next to every plant. I wanted something small and inconspicuous that would tell me when it's time to water the plants. Ideally, data about the plant (humidity, brightness and temperature) would regularly be sent to my server, where it could be plotted and monitored. A few solutions already exist, but they're quite pricey, and it's a lot more fun doing it yourself :)
(If you're not interested in the technical details, you can skip right to the end.)
Finding the right microcontroller
I had some experience with the Arduino Uno board, which I used to hack into my car radio. The board doesn't support WiFi, though, so that would have to be added. The (very) low-cost ESP8266 WiFi chip seemed like a good candidate, but it runs on 3.3V instead of 5V. Adding a voltage regulator would add even more bulk, not something I wanted.I eventually came across the NodeMCU, an Internet of Things microcontroller with the ESP8266 WiFi chip already integrated. The form factor makes sure it fits snugly on a breadboard with some extra room for the sensors.
Setting up the NodeMCU
I ordered the LoLin version (NodeMCU 1.0 ESP-12E), which took some time to get working… By default NodeMCU runs the Lua programming language, but I opted to use the Arduino environment instead. You can find installation instructions here. When doing so, be aware that:- you may need to install the CH340 driver on Windows/Mac. On recent Linux setups the driver should already be there;
- you do not need to flash the NodeMCU's firmware itself;
- you should press and hold the flash button on the NodeMCU just before uploading your program. You can already release it before it's done, i.e., while it's still uploading;
- uploading at 115.200 baud should work just fine;
- when connecting a serial monitor, you have to indicate the same baud as used in the sketch. My NodeMCU defaulted to 9600 baud, so I had to explicitly state 115.200 baud;
- the NodeMCU may not have a built-in LED, so Arduino's BUILTIN_LED constant may not actually work;
- The pins D0, A0 etc. are available as constants in the Arduino environment, so you can use #define LED_PIN D0;
- if you're planning on having the NodeMCU sleep some time to save power, then make sure to short D0 with RST. When it wakes up essentially RST (reset) is pressed.
Analog inputs
Unlike the Arduino Uno, the NodeMCU only has one analog input. But we need three (humidity, brightness and temperature)! I considered an analog multiplexer at first, but it wouldn't fit on the breadboard. Luckily, I came across quite an interesting alternative, using diodes.The idea is to send a high signal (3.3V) only to one sensor at a time, whose analog value is then sent through a diode back to the NodeMCU's single analog input port. Without the diode, the other sensors would interfere with the signal, distorting it. This setup worked quite well: every sensor gave stable signals when changing the input for the others. E.g., the reported humidity level stayed the same when changing the temperature or the brightness the plant was exposed to.
There was one small problem measuring the temperature, though. Relative values are fine for humidity and brightness: low is bad, high is good. Well, sort of. But for temperature that doesn't cut it. Using the thermistor's datasheet and an extra resistor it's possible to calculate the actual temperature being measured, but the diode influences the resistance too, and not in a very predictable way… After some calibration with and without the diode the reported temperatures should now be fine, though :)
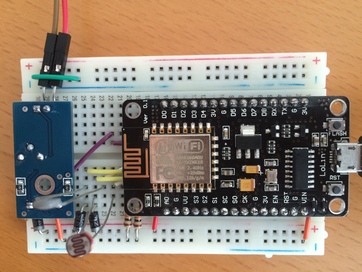
Putting everything together
The breadboard was just big enough to properly fit all the components:

The design could use some improvements, I agree, but hey: it works!
Sending and storing data
The ESP8266 connected to our WiFi without any problems, and after a bit of coding it happily sent the data it gathered to my server. I'm aware sites like ThingSpeak exist, but once again: sometimes it's just more fun doing it yourself :) (Also, I found ThingSpeak to be quite slow…)(P.S.: don't use Arduino's String class: it's apparently quite bad. Just use char* instead :)
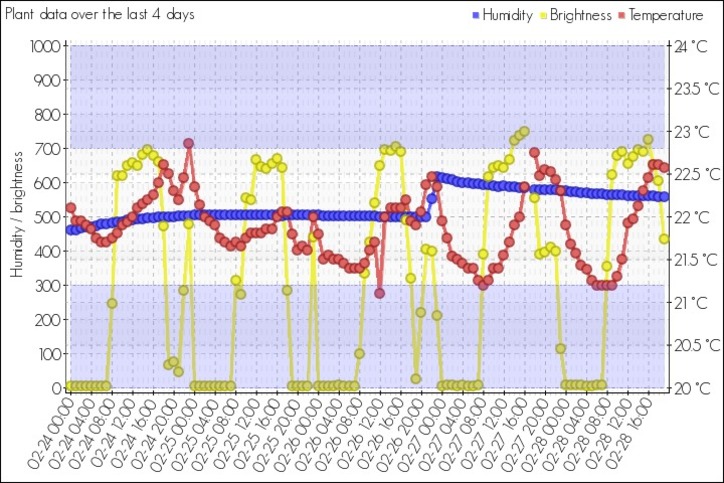
Plant data graphs and monitoring
The end result of the entire setup is a bunch of graphs, showing humidity, brightness and temperature over time:
A couple of things stand out:
- The blue line clearly shows the soil slowly getting drier after we water it;
- The yellow line shows night and day, but also when we turn on the lights;
- The temperature around the plant started following the day/night rhythm.
Future work
In the coming weeks it'd be nice to add monitoring to the system, so that I can get a notification when the plant needs watering.Also, when we're going to add more plants, then referring to "that plant in the corner" doesn't quite cut it anymore when viewing graphs, so we decided to name our plants :P There're going to be four of them, and so far we've got: Pasha (Паша), Marcel, Rotjeknor and Dalek (I just don't like that plant). As you can imagine, better suggestions are welcome ;)